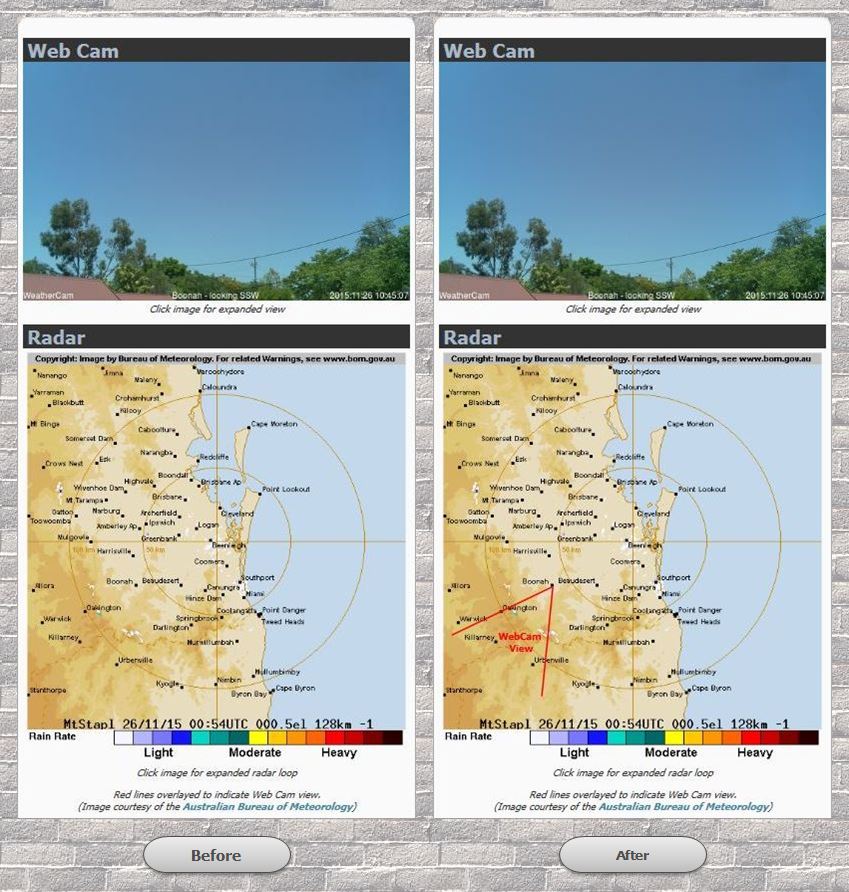
Now that I have my weather cam up and running (albeit temporarily in a bedroom window), I thought it would be good for viewers of my weather site to see which way it is pointed. I know it says on the image that it is aimed towards the south-south-west but where is that in relation to other towns etc?
Then I thought I already have a built-in map on the screen courtesy of the radar image from the Australian Bureau of Meteorology (BOM). All I have to do is draw a couple of lines on it showing the field of view of the camera. The problem is that the image from the BOM isn’t static, a new image is generated every six minutes. I didn’t want to find a way to edit the image every six minutes and thought there must be an easier way. And there is!
All I have to do is overlay a transparent image with two lines depicting the field of view over the top of the radar image. It just has to be the same size and same location on the page as the radar image. So that is what I did. This image shows before and after:
Initially I thought I would create a PNG image in a photo editing program as the PNG format supports transparent images. The difficult part is positioning the lines accurately. What I needed to draw was two vectors; i.e. a line with a starting point and an angle or bearing. That’s when I thought of the Scalable Vector Graphics (SVG) format. This way I can reasonably easily calculate the coordinates of the two vectors. (Remember trigonometry everyone?)
First up I needed to know how big to make the SVG image. I just got the dimensions of the radar image – 524 x 564 pixels. Then I wanted to know the location of my starting point – the town of Boonah on the map. Coordinates in an SVG file are located by measuring down from the top and across from the left side.
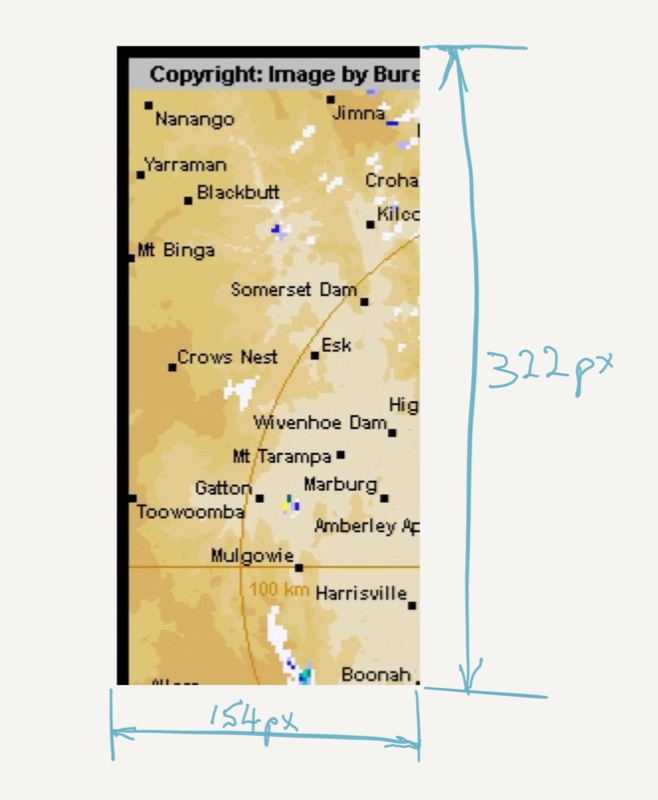 To find the coordinates of Boonah, I simply cropped the right hand side and bottom of a radar image so that the town of Boonah was on the lower righthand corner of the cropped image. The starting point is simply the dimensions of the cropped image – (154, 322).
To find the angle of the lines or vectors, I used a compass to get a bearing from the camera to trees on both the left and right side of the weathercam shot and then added the adjustment to go from a magnetic bearing to a grid bearing. This adjustment factor is 11° in my part of the world.
So now I had the starting point of the two lines and the bearing of each. From this I used trigonometry to calculate the coordinates of the end points of the two vectors – (17, 388) and (139,471). I was now ready to code the SVG image as shown here.
<div class="section_head">
  Radar
</div><!-- end .section_head -->
<div class="radar_img">
  <div id="radar_stack">
    <img src="http://www.bom.gov.au/radar/IDR663.gif" alt="Radar" />
    <a href="http://www.bom.gov.au/products/IDR663.loop.shtml">
      <svg viewBox="0 0 524 564">
        <line x1="154" x2="139" y1="322" y2="471" stroke="red" fill="transparent" stroke-width="2"/>
        <line x1="154" x2="17" y1="322" y2="388" stroke="red" fill="transparent" stroke-width="2"/>
        <text x="80" y="395" style="fill:red;">WebCam
          <tspan x="95" y="410">View</tspan>
        </text>
      </svg>
    </a>
  </div> <!-- end .radar_stack -->
  <p>Click image for expanded radar loop</p>
  <p>Red lines overlayed to indicate Web Cam view.<br />(Image courtesy of the <a href="http://www.bom.gov.au/">Australian Bureau of Meteorology</a>)</p>
</div> <!-- end .radar_img -->
You can see the underlying radar image being displayed in Line 105. Lines 106 to 114 are the overlayed SVG image (Line 106 makes it a clickable hyperlink). Then as you can see, I wrapped both images in a container div with an ID of radar_stack. The SVG code includes two lines to display the text “Webcam View” between the two lines.
Now I have the HTML part of the code done, I have to style it so the two images are in fact layered on each other. Here is the CSS code I added.
#radar_stack {
  position: relative;
}

#radar_stack a svg {
  position: absolute;
  width: 100%;
  top: 0;
  left: 0;
  z-index: 2;
}
The first part gives the radar_stack wrapper a position of relative. Then the second part positions the SVG image absolutely at the top left of the wrapper (0,0).
And that is all there is to it. Now all I have to do if I reposition my camera is calculate the new end points of both lines and update them in my code. Much easier than recreating a PNG image.